General
Scheduled TasksHow to Add a Pay GradeRemoving Duplicate UsersHow to Add an Asset TypeHow to add a PropertyHow to add PermissionsImport or Export SpreadsheetsNoticesAdd a Data EntityRestrict Services in DependenciesHow to View the Change LogHow to Add a Charge GroupHow to Add a PositionHow to Add a MetricHow to Add EquipmentView Associated ServicesScheduled Tasks
The following scheduled tasks are needed:
Database backup
Cron snippet
58 23 * * * cd /var/www/serviceview/bin; /usr/bin/php backupDatabase.php
The backup database script can be run at any time to create an immediate backup of the database. This is useful to do before spreadsheet imports or before any major data reworks.
The script will by default store backups in the ../backup directory. It will keep the last 8 days on backup and a backup for each month. In addition a quarterly snapshot is created and stored in the ../backup/snapshots directory.
Updating Time Zones
Time zone updates are needed for cities that use daylight savings and require a time change. Time zones are retrieved from a Google API based on their longitude and latitude.
Cities longitude and latitude are pulled from the file /bin/TimeZones.csv
Cron Snippet
50 1 * * * cd/var/www/serviceview/bin; /usr/bin/phpupdateTimezones.php<</tmp/exports.txt
Copying the Database to Another ServiceView Instance,/h2>
Should you want a test or development instance of ServiceView the following script will copy the production database every hour. Some parameters can be changed after the database is copied by adding SQL statements in the script.
Cron snippet
* * * * * cd/var/www/serviceview/bin; /usr/bin/phpcopyDB.php<</dev/null
Other Scheduled Tasks
Monitoring, collecting data and seding SMS are all performed in one script to return every minute. The script works out what jobs are needed.
Cron snippet
* * * * * cd/var/www/serviceview/bin; /usr/bin/phprunCron.php<</ev/null
Sample Cron
It is recommended the following cron is used running under root.
58 23 * * * cd /var/www/serviceview/bin; /usr/bin/php backupDatabase.php
50 1 * * *  cd /var/www/serviceview/bin; /usr/bin/php updateTimezones.php << /tmp/timezones.txt
0 * * * *   cd /var/www/serviceview/bin; /usr/bin/php copyDB.php << /dev/null
* * * * *   cd /var/www/serviceview/bin; /usr/bin/php runCron.php << /dev/null
How to Add a Pay Grade
A pay grade is a unit to indicate a salary range. In ServiceView, all employees are given a specific pay grade which determines their salary. This guide will cover the basics of creating a new pay grade, and then linking that to an existing employee in the system.
1. Adding a Pay Grade
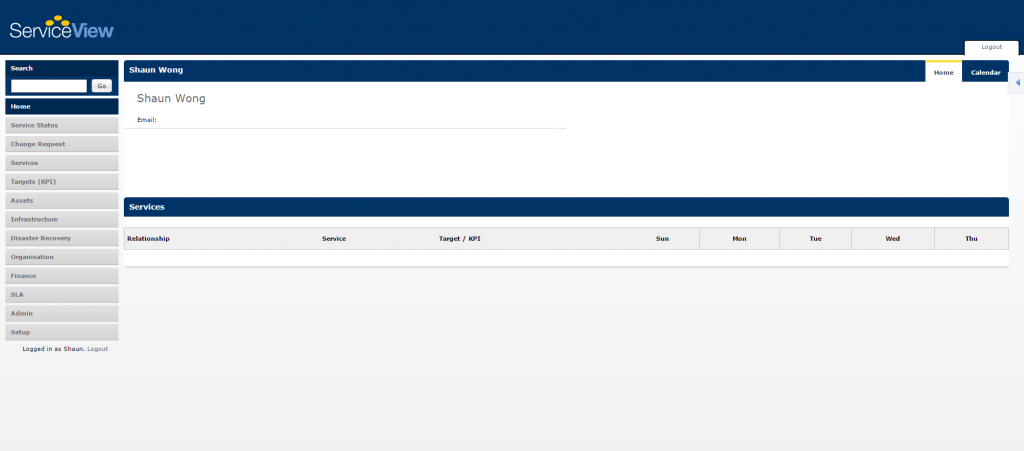
This guide starts from the ServiceView homepage and requires you to have Salary Admninistrator privileges. After successfully logging in, the following screen should be displayed:
Next, click on the Admin tab located in the side menu to the left of the page. A drop down menu will then appear, click on the Positions tab from that menu.
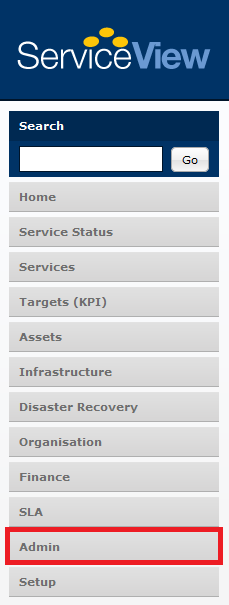
This would redirect you to the Positions page, where you would be able to add a new pay grade.

To add a position, simply click on the  icon located to the top right of the screen as highlighted in the image above.
This would open a pop-up window as shown below:
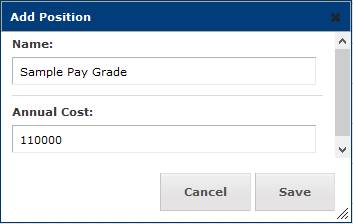
To keep any changes made, click on the Save button. Otherwise, Cancel discards all changes.
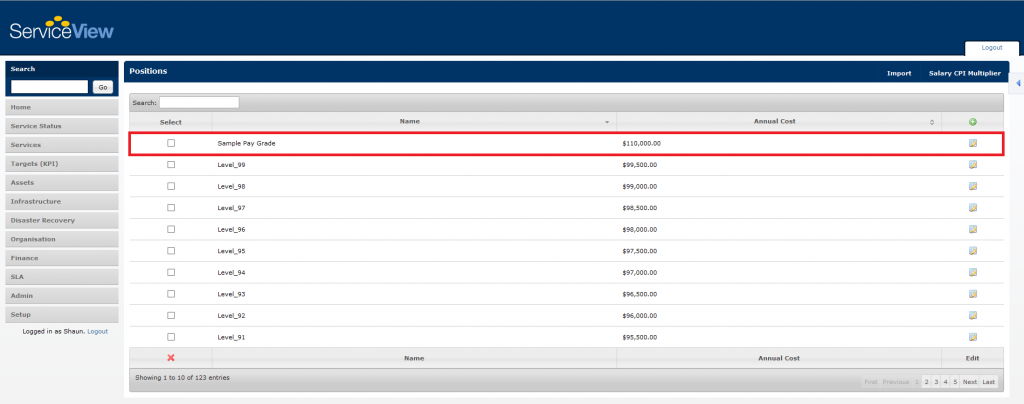
The newly added pay grade should now be reflected in the main table in the Positions page:
2. Adding Pay Grade to a Person From My Team
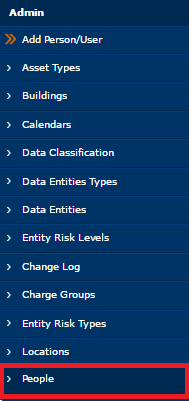
To access the Teams page, click on the Admin tab from the side menu located to the left of the screen. A drop down menu will then appear, click on the Teams tab located in that menu.
This would then bring you to the Teams page where you can find your team:
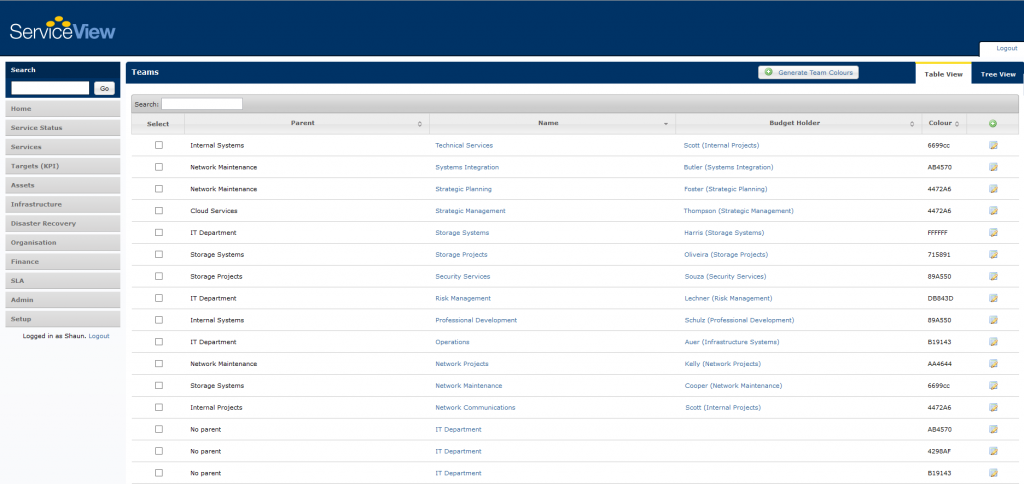
As an example, suppose your team is Technical Services (first entry in the table).
First, access the Technical Services team page by clicking on its name.
You will then be redirected to the Technical Services team page as shown below:
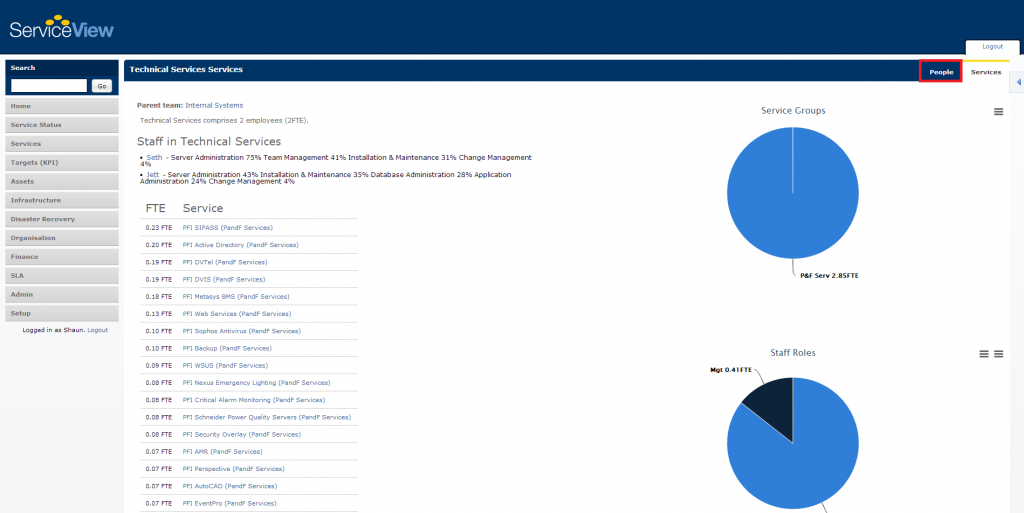
From here, click on the People tab as shown in the image above.
You will then be able to see the people (staff) working for that team such as in the image below:

To add the new pay grade, click on the edit icon highlighted in the image above.
A pop-up window will appear such as the one below:
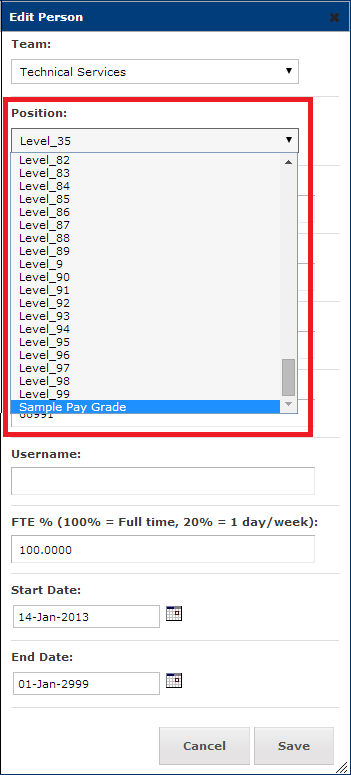
Under the position option, find your newly added pay grade (as illustrated above) to link it with the selected person.
Click Save to keep any changes made or Cancel to discard all changes.
Removing Duplicate Users
When there are two people in ServiceView listed in error but they should be just the one person, follow the steps below.
From the left Menu bar select Admin and then select People from the options.
In the search bar, type either the first name or last name of the person to be removed and it will return all entries for that person.
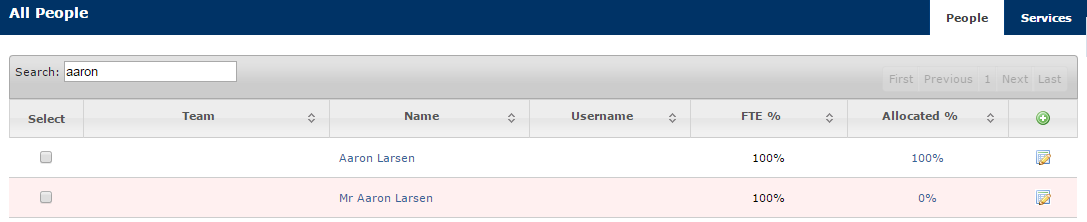
At this point, you may want to check that the username is attributed to the correct person. If the person you are removing has a username attributed to it, the username will be removed when you delete the person. Once the duplicate person is removed, you will then need to add the username to the remaining correct person.
To remove one of the people, tick the box for that person and press the Delete 'x' button
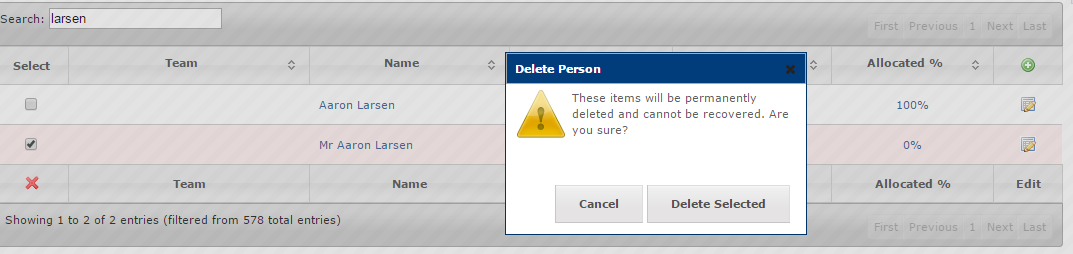
This will remove the person.
How to add an Asset Type
If you are not signed as an Admin you can't create the asset type but you can create an actual asset.
Asset Types
From the left Menu bar select Admin and then choose Asset Types from the options.
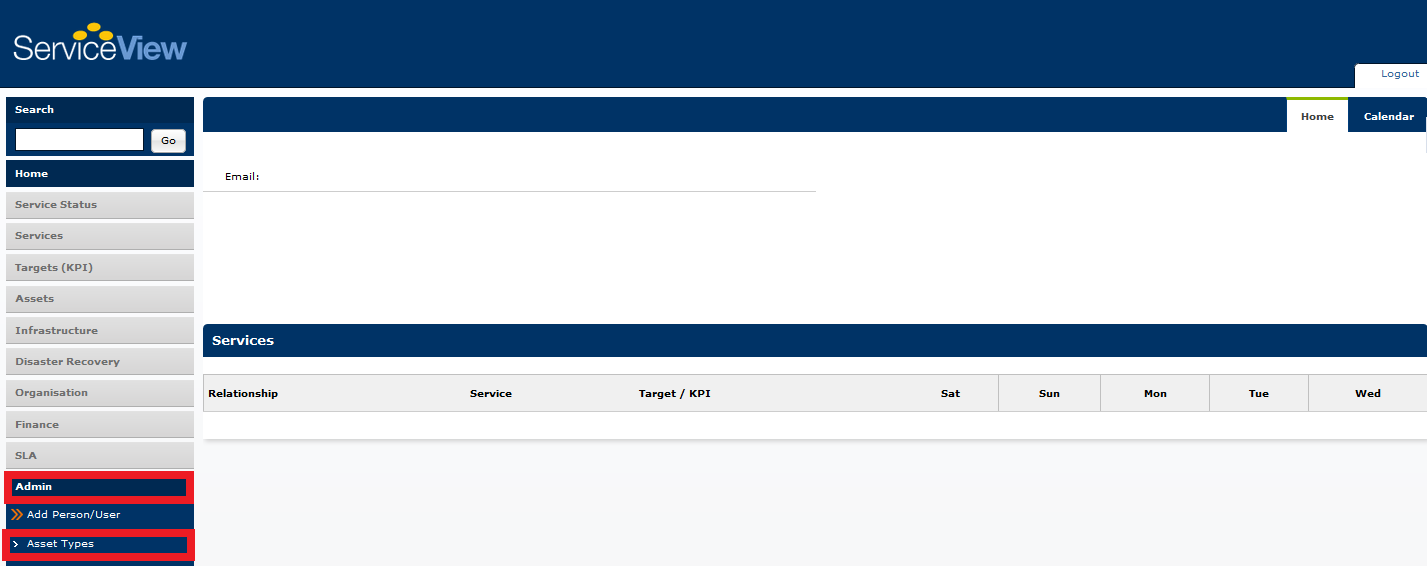
Click on the  icon to open the add asset type dialog.
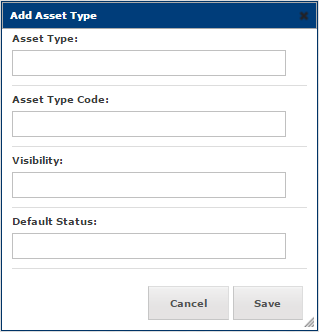
Fill in all fields and click Save.
How to edit an Asset
From the left Menu bar select Assets and select the asset you would like to edit from the options presented.
Once the Asset has been selected it will display a list of all entries under that particular asset.
Click on the icon to open the Add
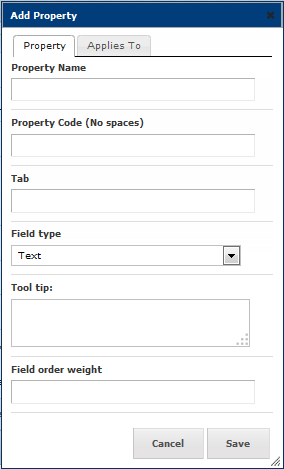
How to add a Property
From the left Menu bar select Admin and then choose Service Properties from the options.
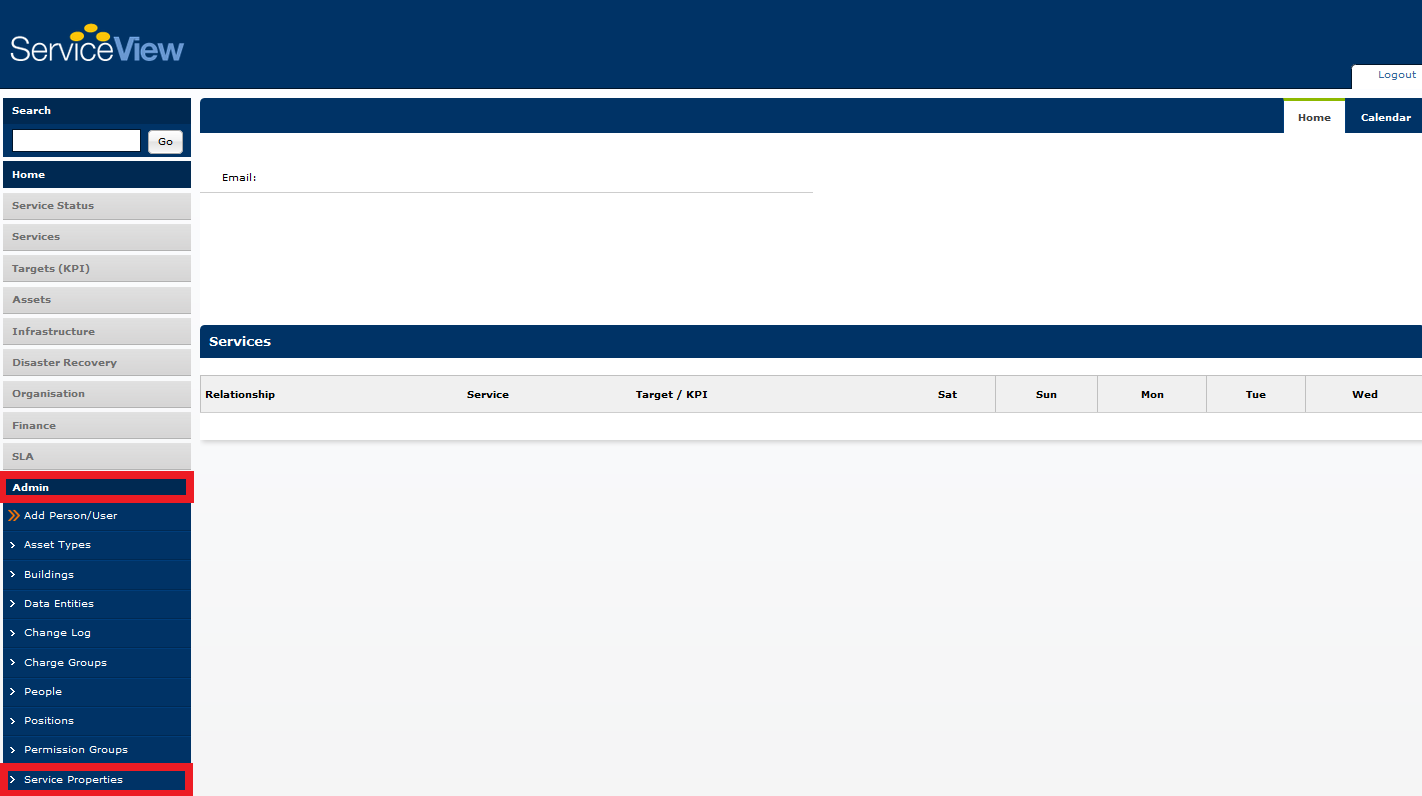
Click on the  icon to open the add asset type dialog
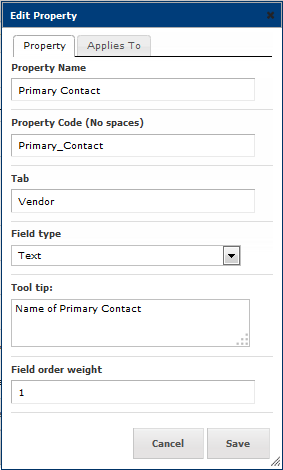
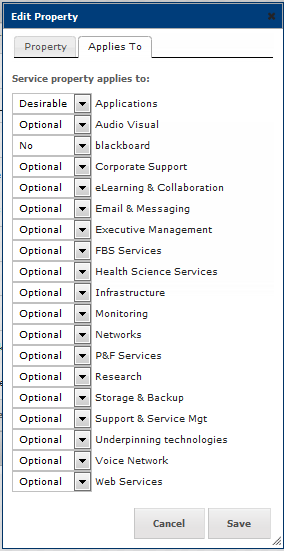
How to edit a Property
From the left Menu bar select Admin and then choose Service Properties from the options.
Click on the  icon to open the edit property dialog.
 |  |
How to add a user to a Permission Group
Permission Groups provide users with the ability to restrict access to selected Services. ServiceView offer 2 Permission categories 1) User Permissions and 2) Service Permissions. It is assumed that if multiple permission sets apply to any given service, then the highest level of access for a user is what will be granted.
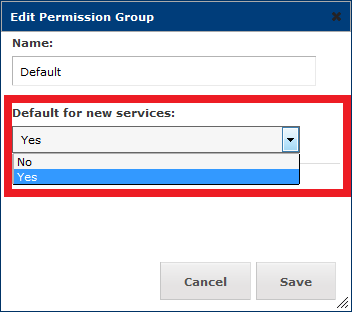
 Note: The Default Permission group will apply to all current and new services that have no other Permission Group set. The Default Permission group set users as Standard Users. Standard Users have the ability to view/edit any Service.
Permissions
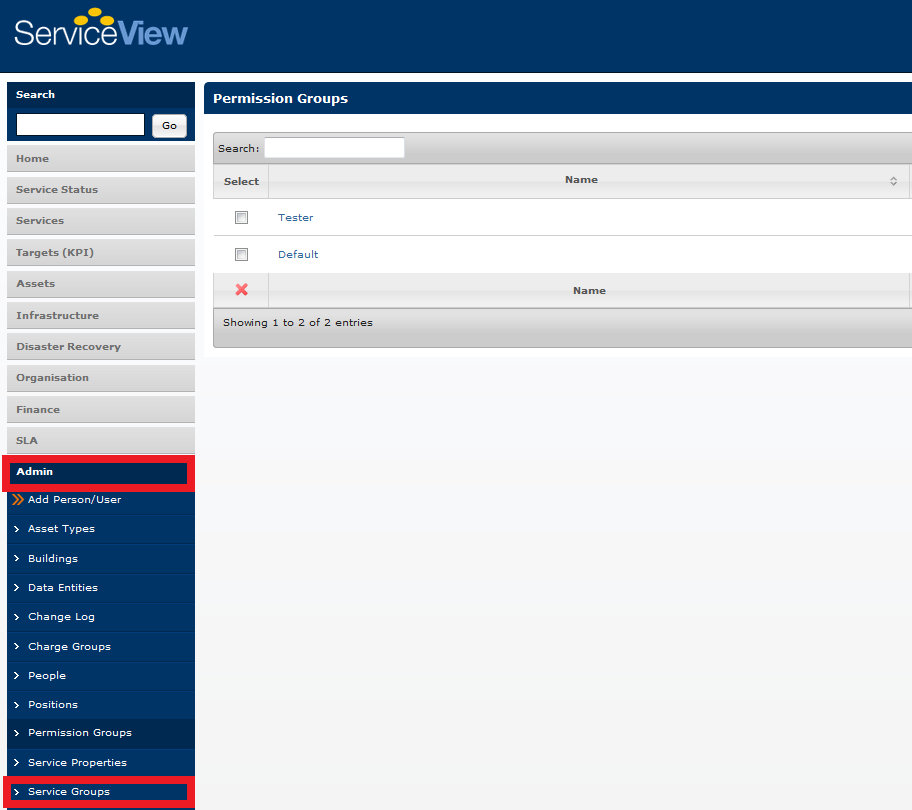
From the left Menu bar select Admin and then choose Permission Groups from the options.
Locate and click on the name of the preferred Permission Group from the list.
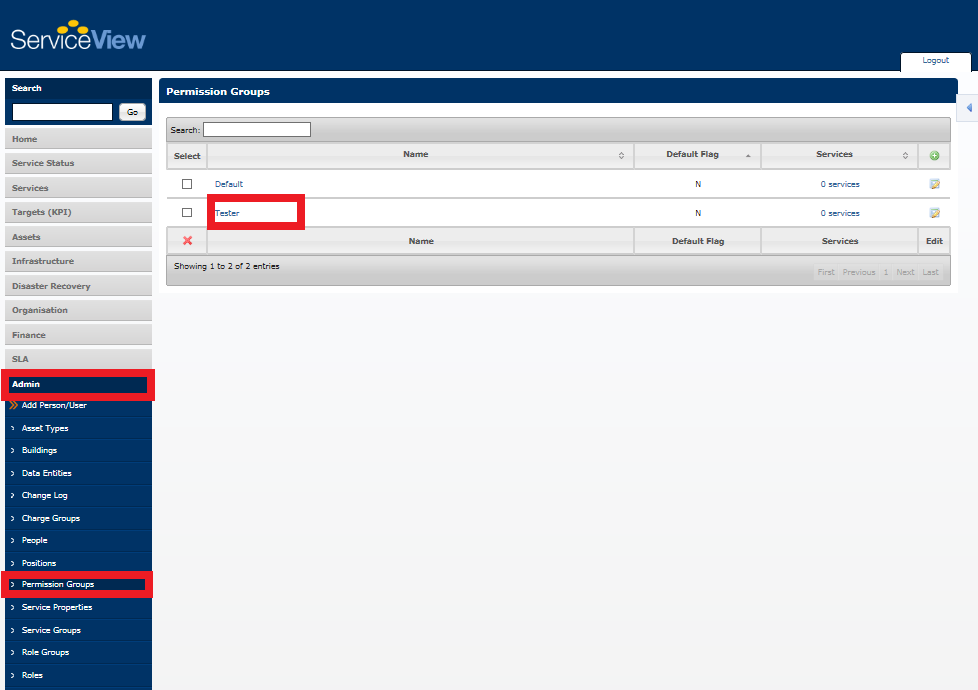
An alert box allowing you to edit the Permission Group will be displayed.
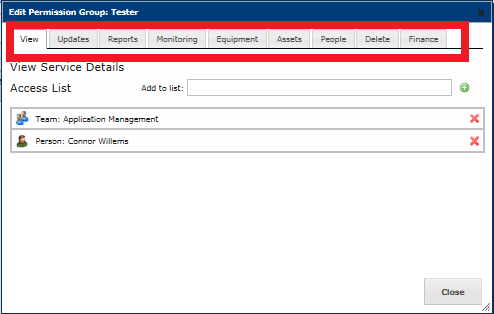
| View | Updates | Reports | Monitoring | Equipment | Assets | People | Delete | Finance |
In the Add to list field type in the User/Service Group.
Click on the  icon to open the edit permission group dialog.
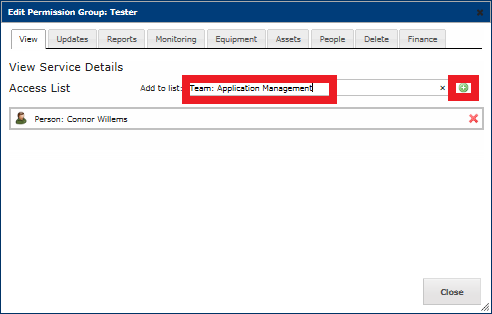
Proceed along by selecting each of the tabs and adding users/groups as required.

 You will notice that each tab has an option to Copy permissions from. This is particularly handy if you are using the same permissions for all tabs.
Note: Permissions provide the ability for people to have access to information that they would not normally have e.g. Finance.
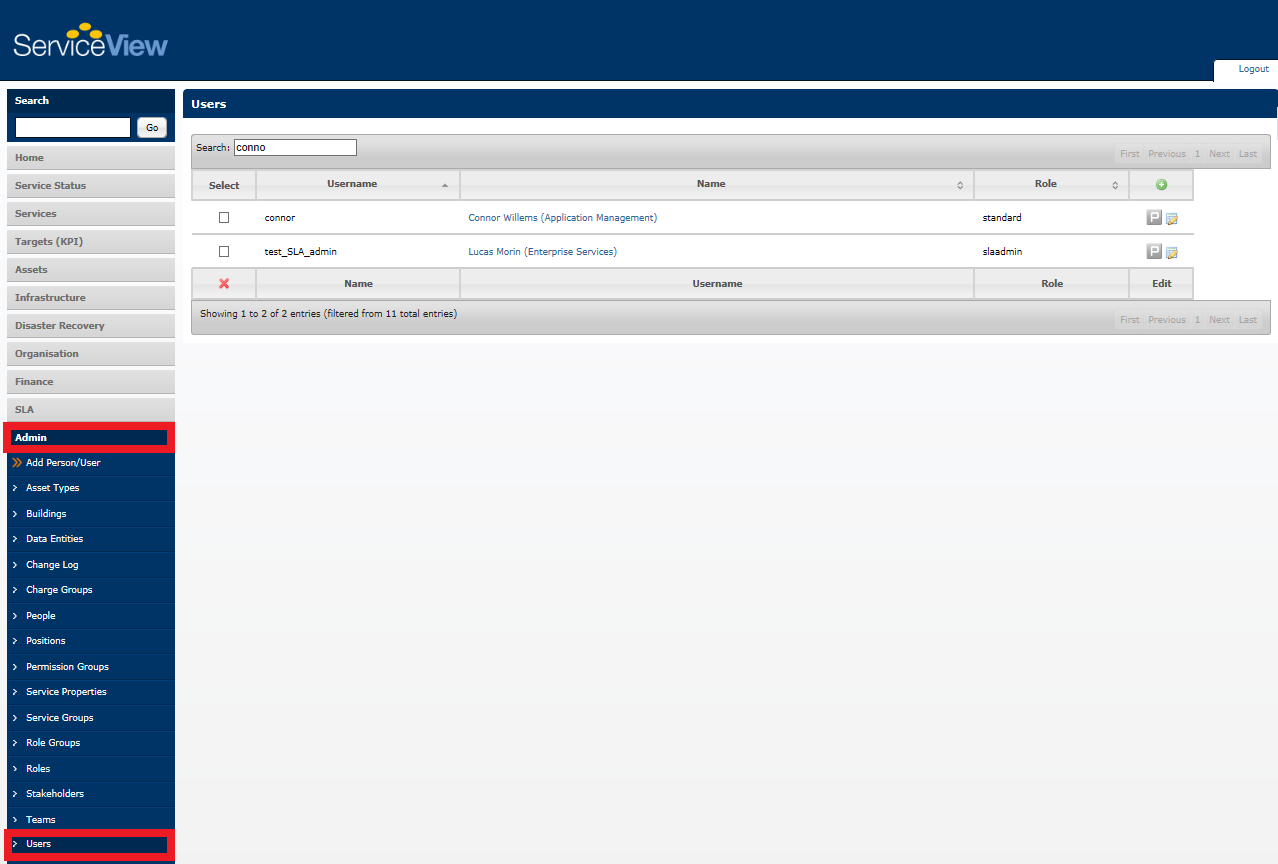
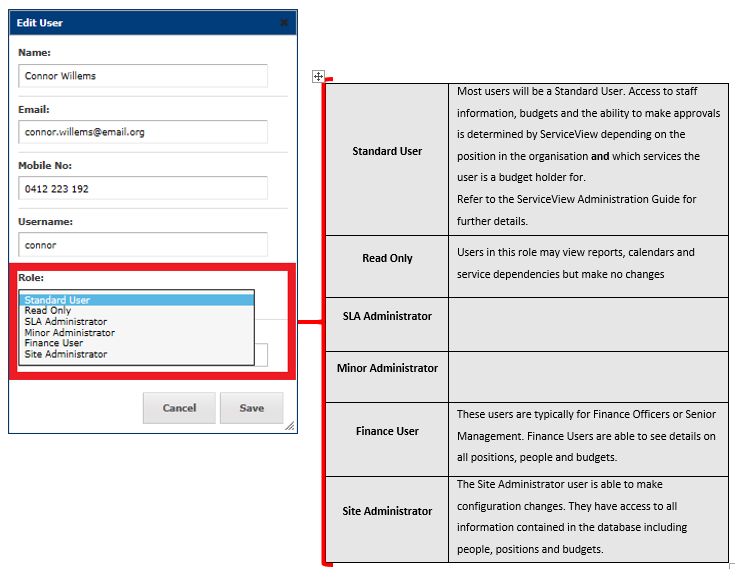
How to change the Permissions for a user
It is recommended that Permissions are set based off "Roles" rather than by "Users" e.g. Service Owner/Budget Owner/Technical Owner. This way different people can be given access depending on which teams they are in.
From the left Menu bar select Admin and then choose Users.
Click on the  icon to open the edit user dialog.
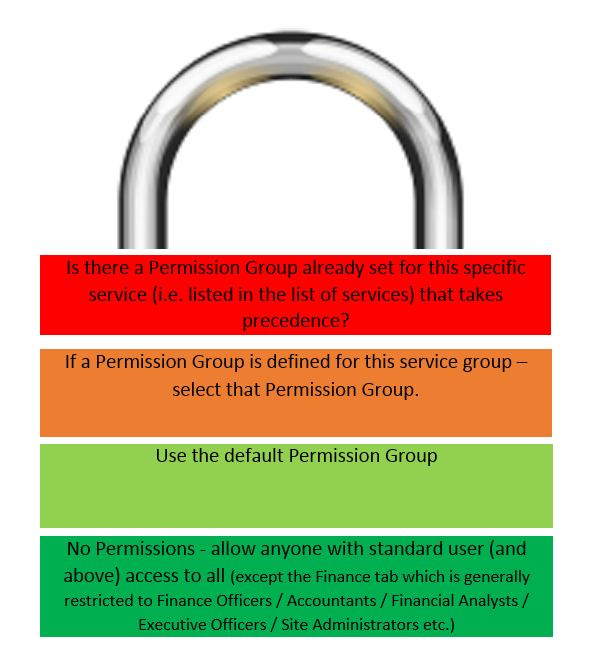
Permission Order
How to create the Default Permission group
From the left Menu bar select Admin and then choose Permission Groups from the options.
Click on the icon to open the edit permission group dialog.
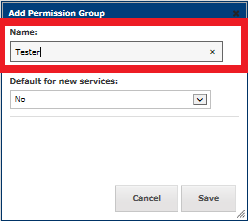
How to create a Permission Group
From the left Menu bar select Admin and then choose Permission Groups from the options.
Click on the icon to open the add permission group dialog.
How to add a Permission Group to an individual Service or a group of Services
From the left Menu bar select Admin and then choose Permission Groups from the options.
Locate the Permission Group you would like to assign to the Individual Service or the Service Group. Select the Services link for that Permission Group.
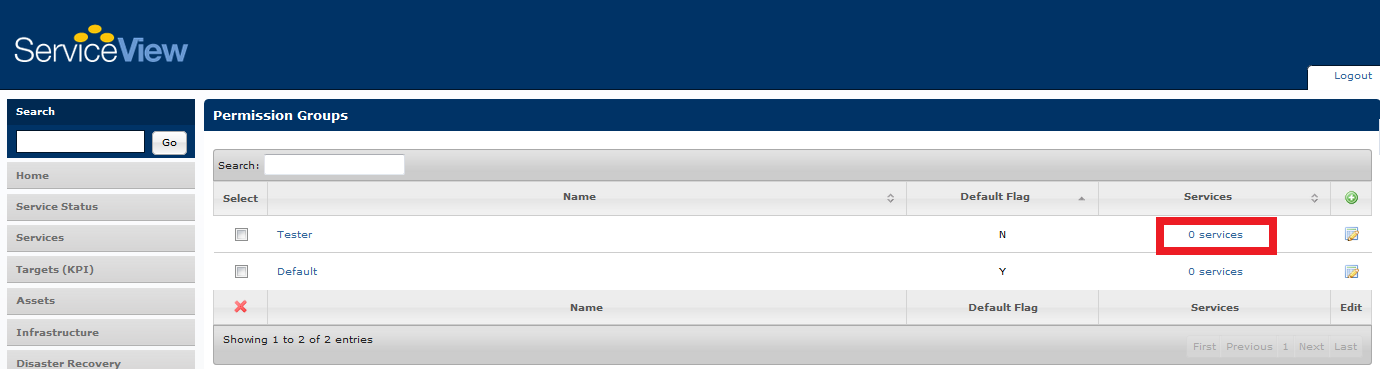
An alert box allowing you to Edit Permission Group Services will be displayed. In the Add service to group field type in the Service/Service Group.
Click on the icon to open the edit permission group services dialog.
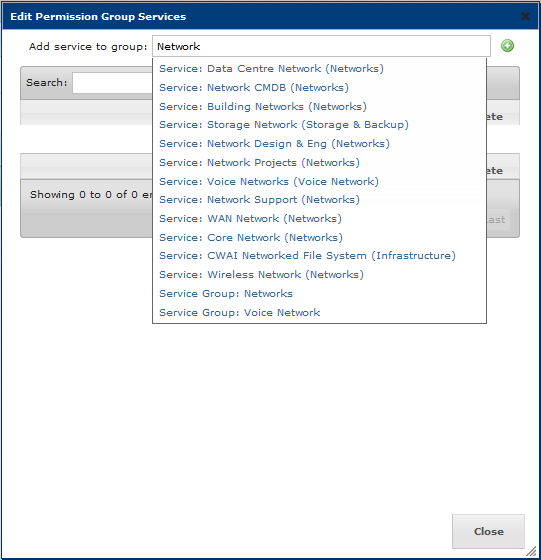
Note: this will only work with current services. Permissions for new services will have to be added as they are created.
How to add a Permission Group to a Service Group
 Setting a permission group here will make it apply to all services within that service group (current and new ones).
From the left Menu bar select Admin and then choose Service Groups from the options. Locate the Service Group and Click on the icon to open the Edit Service Group dialog.
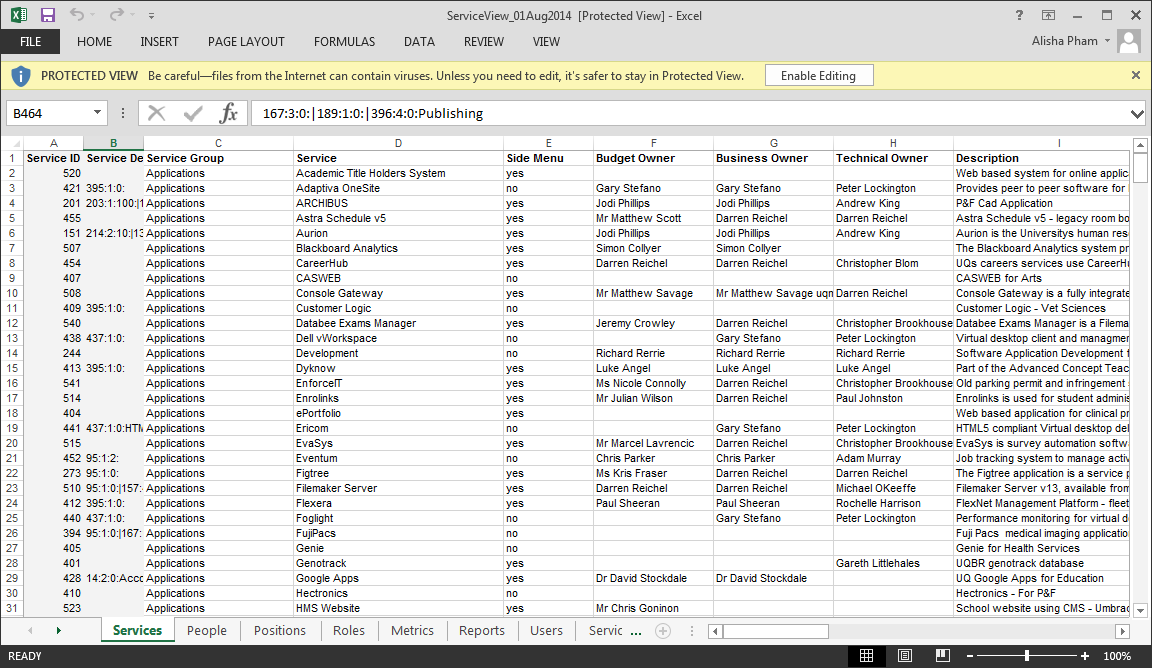
How to download ServiceView data onto a Spreadsheet
All data contained within ServiceView can be imported/exported into an Excel spreadsheet.
From the left Menu bar select Reports and then choose Download Spreadsheet.
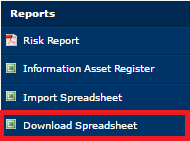
Once the download is finished, open the Excel spreadsheet to see all the information about ServiceView including users, services, positions, roles, metrics, reports and more.
How to import a data spreadsheet into ServiceView
All data contained within ServiceView can be imported/exported into an Excel spreadsheet.
From the left Menu bar select Reports and then choose Import Spreadsheet.


Locate the file you want to import and double click to select.Select Upload Spreadsheet. The system will then read the file you are importing and advise if there are any errors that will restrict the file being imported successfully.
If no errors are displayed, select Import to finalize.
Notices
Another way to keep track of changes that you need to approve as a stakeholder or a team change manager is the notices feature which is on the homepage when you log in. This is a list of any changes that are pending your approval.

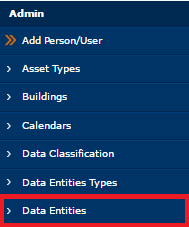
How to Add a Data Entity
From the left Menu bar select Admin and then choose Data Entities from the options.
Click the  icon.
icon.
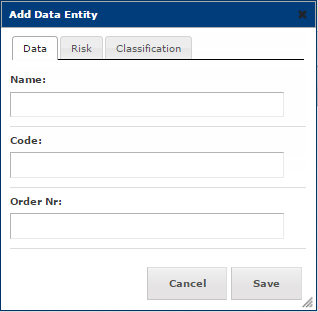
Fill out the required information and click Save.
How to Edit a Data Entity
From the left Menu bar select Admin and then choose Data Entities from the options.
Click the  icon.
icon.
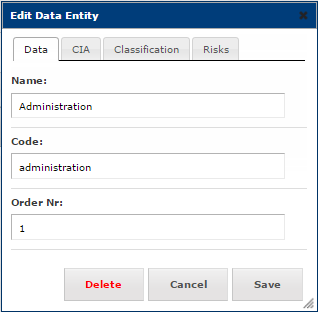
Fill out the required information and click Save.
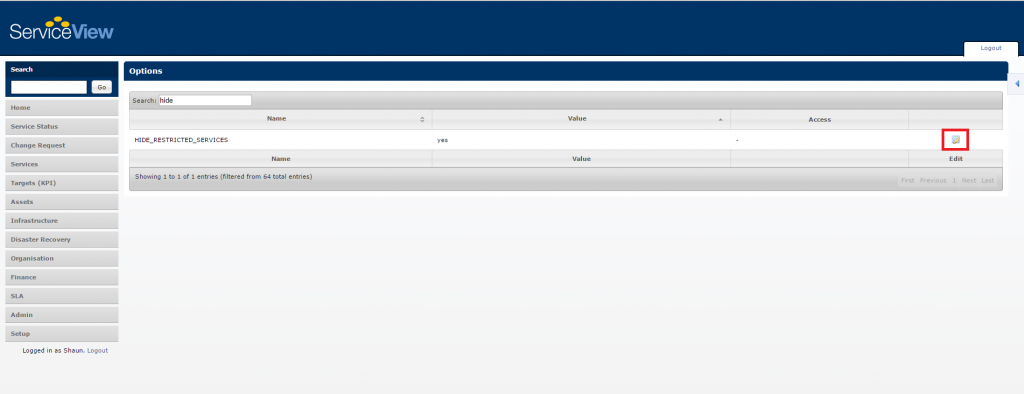
How to Restrict Service Showing in the Dependency Diagram
By default, restricted services in ServiceView are shown in all dependency diagrams of other services. However, it is possible to hide these restricted services if necessary.
This guide will cover the basic steps required to perform such a change.
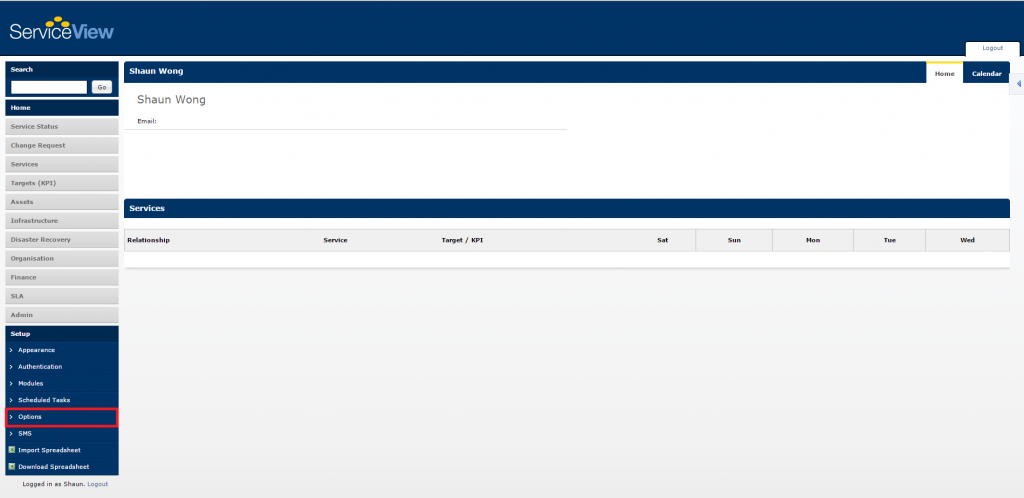
This guide begins from the ServiceView homepage. After successfully logging in, the following screen will be displayed:

Click on the Setup tab located in the side menu to the left of the screen. A drop down menu will then appear, click on the Options tab located in this menu as shown below:
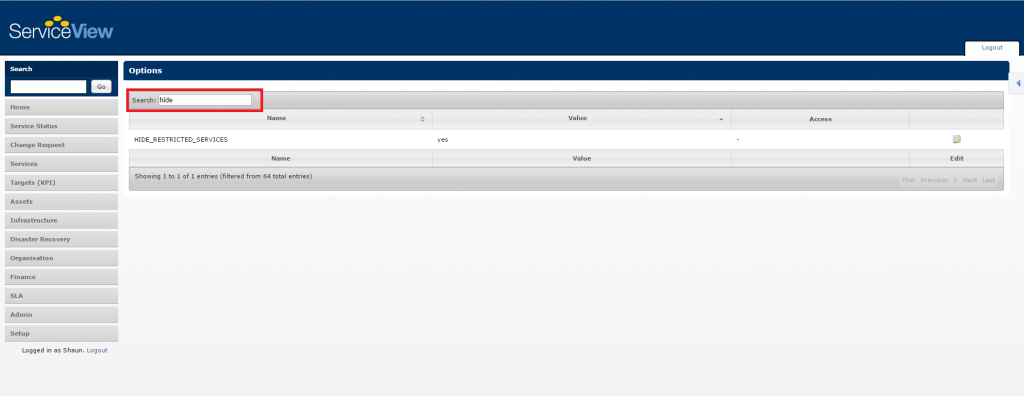
You will then be redirected to the Options page as shown below:

This page contains all the options of ServiceView. For an explanation to what each option does, please refer to the Option Guides which can be found in the Setup section.
Next, find the option "HIDE_RESTRICTED_SERVICES". To do this, search for this option via the search bar as depicted in the image below:
To ensure that restricted services are hidden, the value of this option needs to be set to yes.
Click on the Edit button as shown in the image below:
A pop-up window will then appear as shown in the image below:
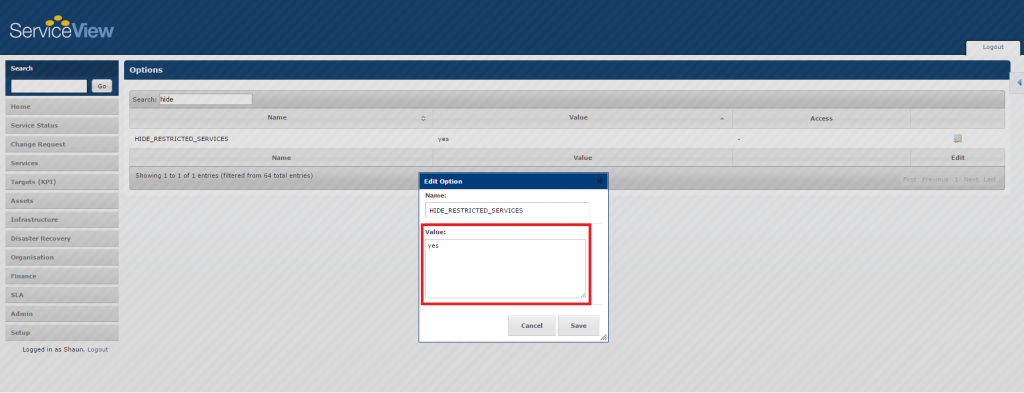
Set the Value field to yes. Next, click Save to apply the new settings. Restricted services will now be hidden from all dependency diagrams.
Note: Do not capitalise the first letter in the value
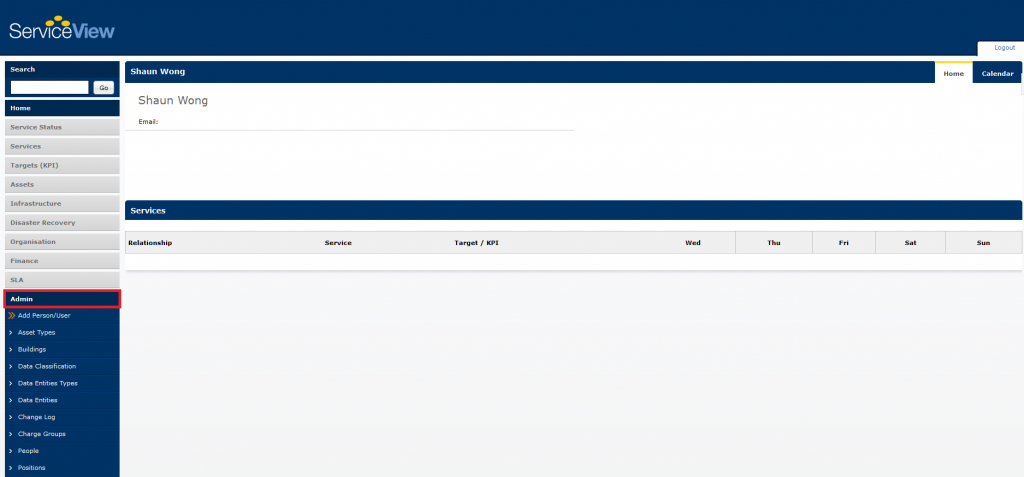
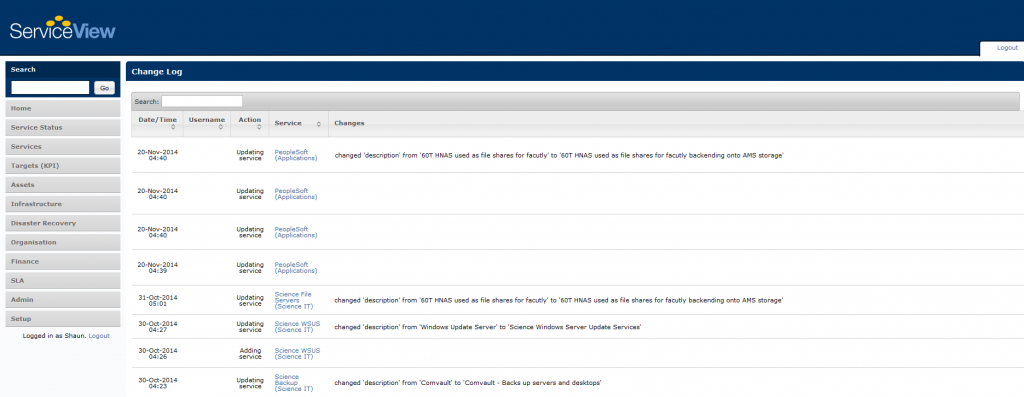
How to View the Change Log
The change log in ServiceView is a historical record of all changes made to services. It records information such as the date of change, the service affected, the list of changes made and who initiated the change. This guide provides the basics on where to find this information.
This guide will begin from the ServiceView homepage. After successfully logging in, you will be presented with the following screen:

Next, click on the Admin tab located in the side menu to the left of the screen. A drop down menu will then appear, click on the Change Log tab located in that menu.
This would then redirect you to the Change Log page as shown below:
How to add a Charge Group list
Charge Groups include items such as Consultants, Contractors, Equipment, and Lease Payments etc. It is used for the benefit of ensuring that all related charges attributed to a Service are categorized and apportioned appropriately.
Charge Groups
From the left Menu bar select Admin and then choose Charge Groups from the options.
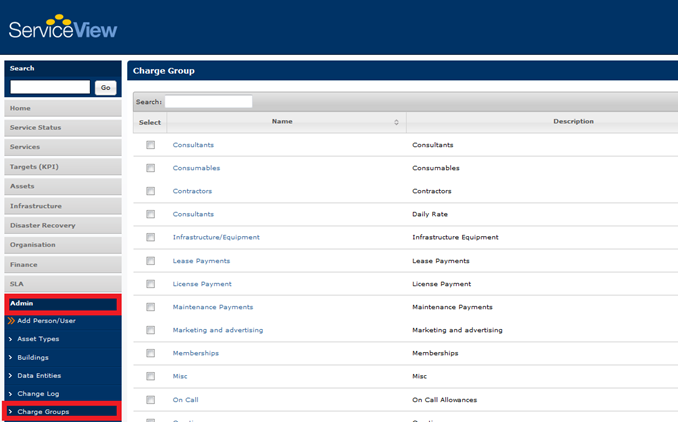
Click on the  icon to open the add charge group dialog.
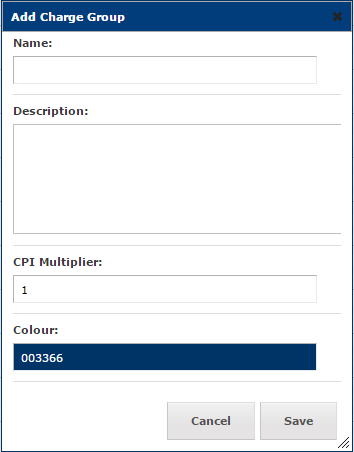
When finished click Save.
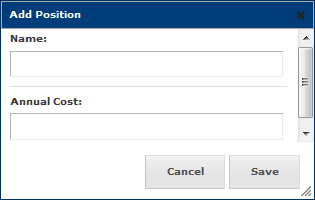
How to Add a Position
Positions include a list of all positions and their associated annual cost i.e. Salary.
From the left Menu bar select Admin and then choose Positions from the options.
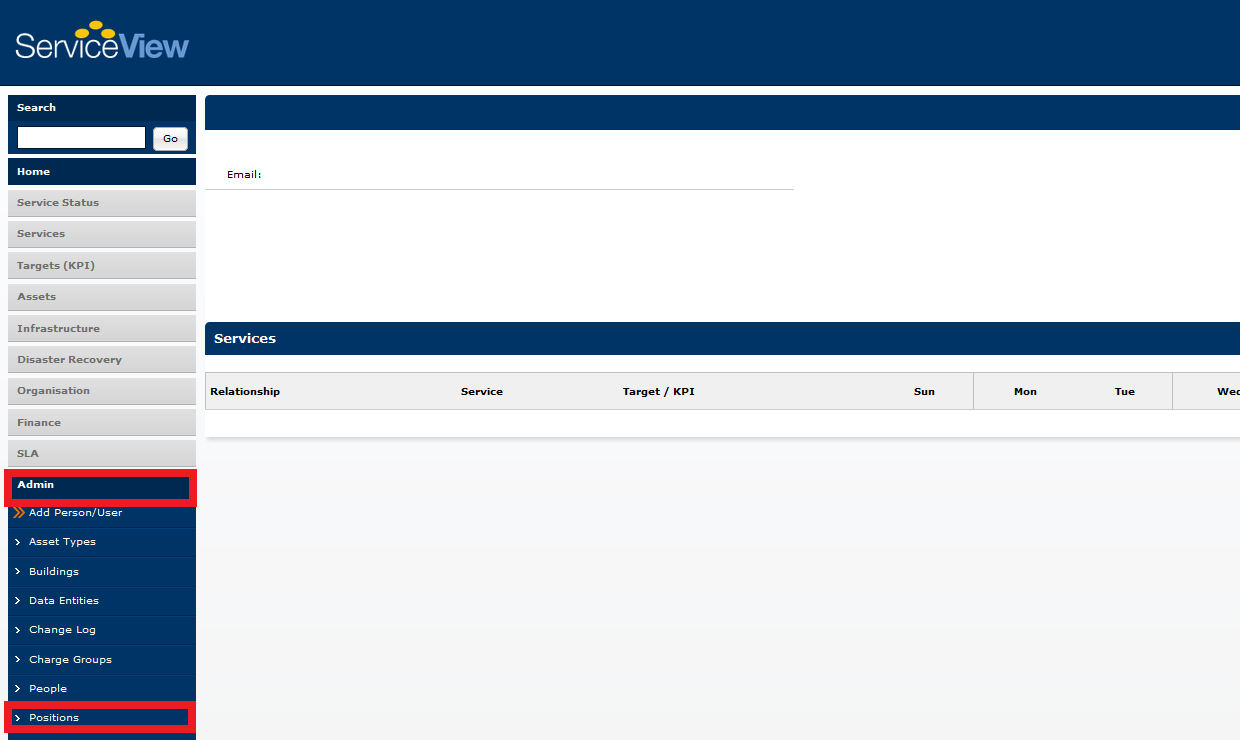
Click on the  icon to open the add position dialog.
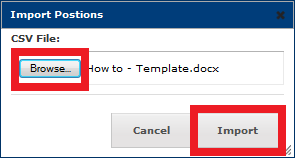
How to Import Positions using a CSV file
From the left Menu bar select Admin and then choose Positions from the options. Click on the Import option at the top right side of the screen.

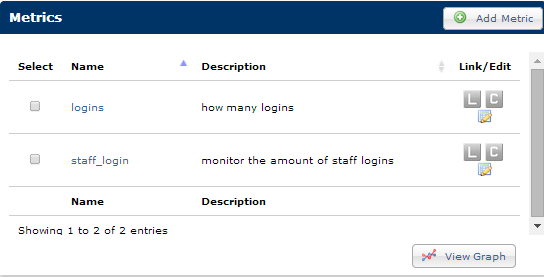
How to add a Metric
Adding a Metric that is used for reporting purposes.
From the left Menu bar select Services and then locate the Service of choice.
Select the Reports tab which is located at the top of your screen, scroll down to view Metrics.
Click on the 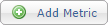 icon and complete required fields.
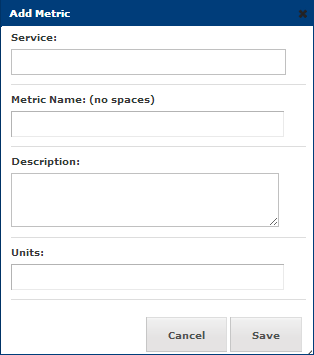
Click Save when you're finished.
In addition to the usual  edit option, you will notice that there are 2 additional icons
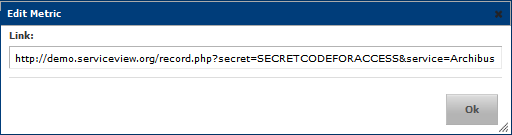
The  icon stands for Link or code that is needed for the monitoring script.
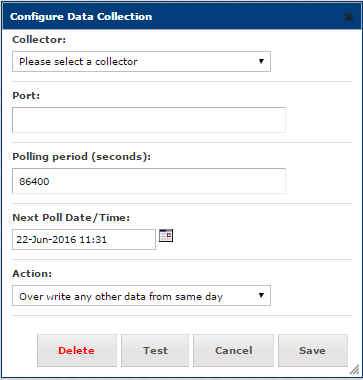
The  icon stands for Configure/ Configure your Data.
To view the graph for the selected Metric you will need to ensure that the tick box next to that particular metric is selected.
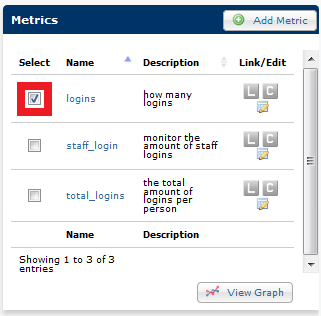
Then click on the  icon
icon
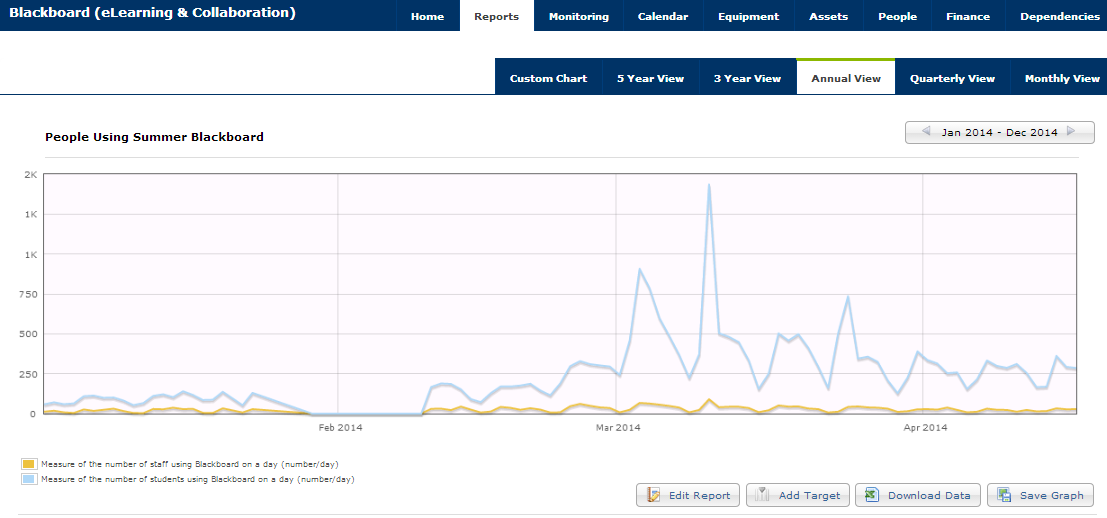
Below is a sample Graph of all the number of different staff and students logging into blackboard on a given day.
How to add Equipment
From the left menu bar select Infrastructure then select Equipment from the options.

Click on the  icon to add Equipment.
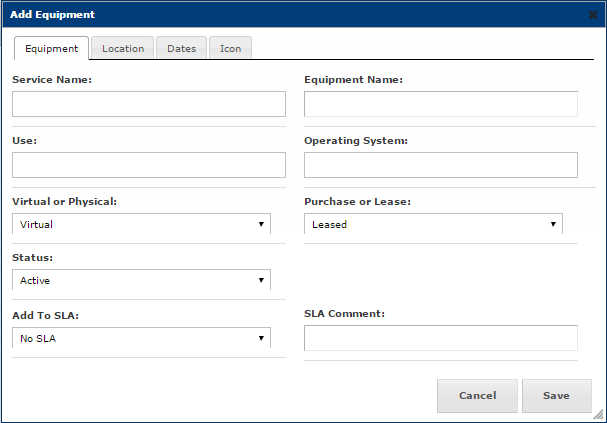
Complete all fields and Save once done.
Note: You can also download a PDF copy of this as well.
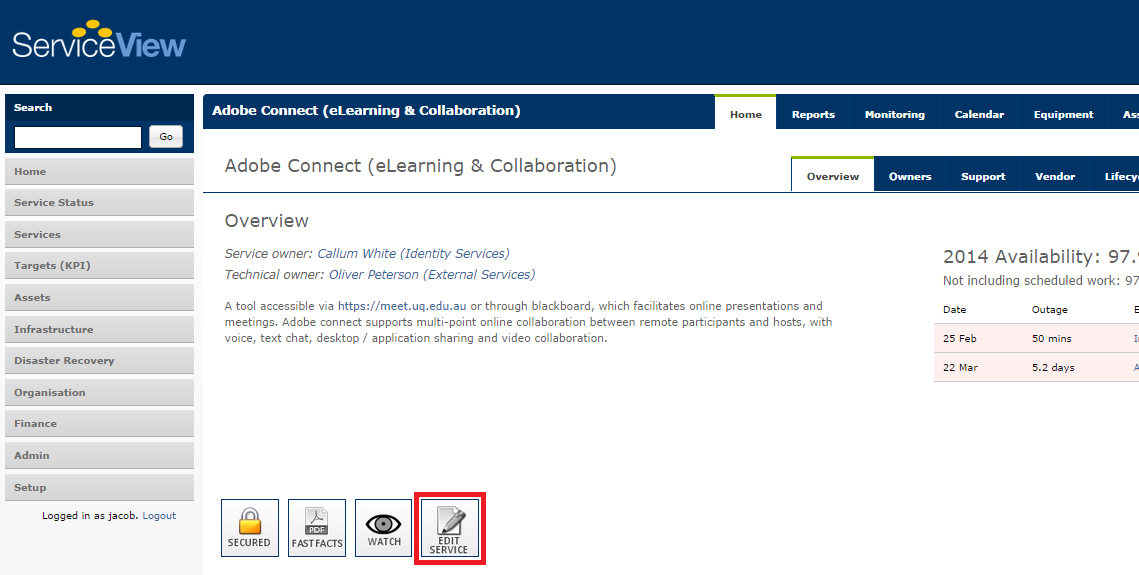
How to View only the Services I am associated with
From the left Menu bar ensure you are in the Home screen.
From the top menu bar, there will be a tab titled My Services which you will need to select.
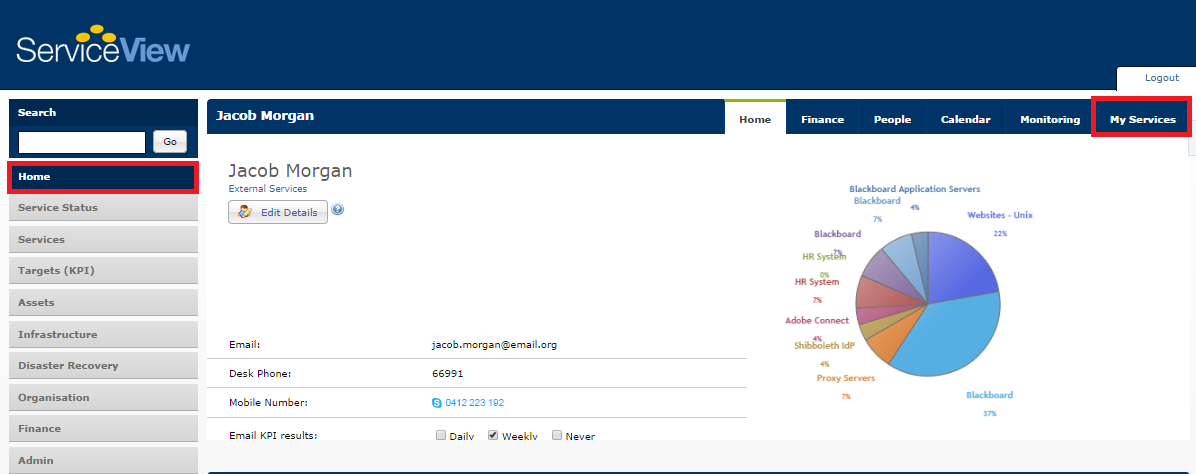
A list of all the services you are associated with will be displayed. This will enable you to easily see if any of the services you are associated with are missing any important data.
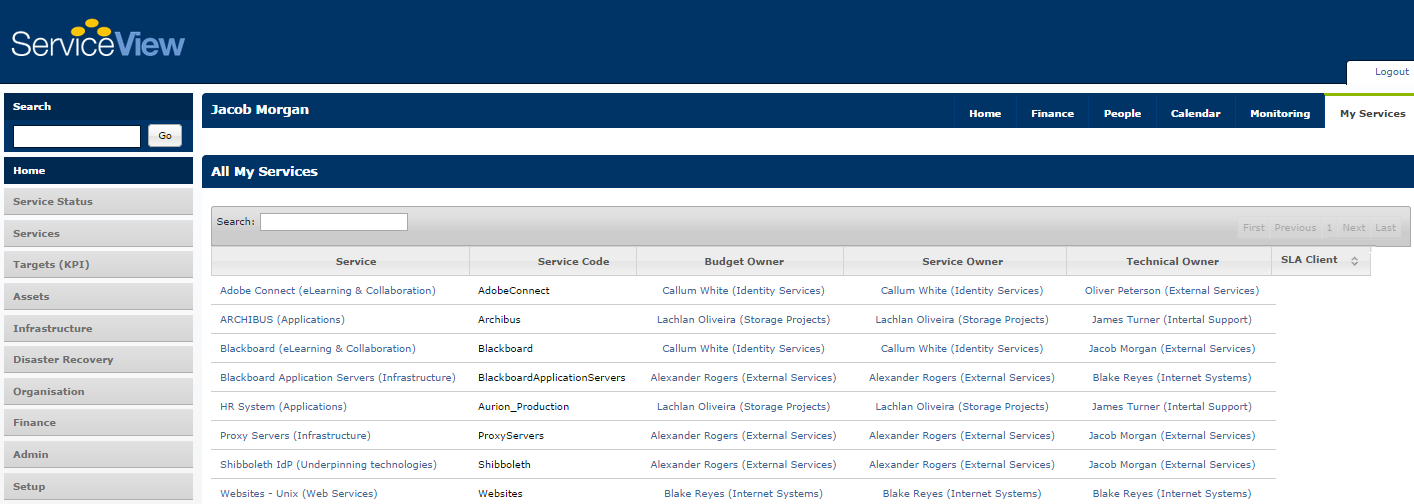
To edit any of the Services which are missing data, you will just need to select the Service.
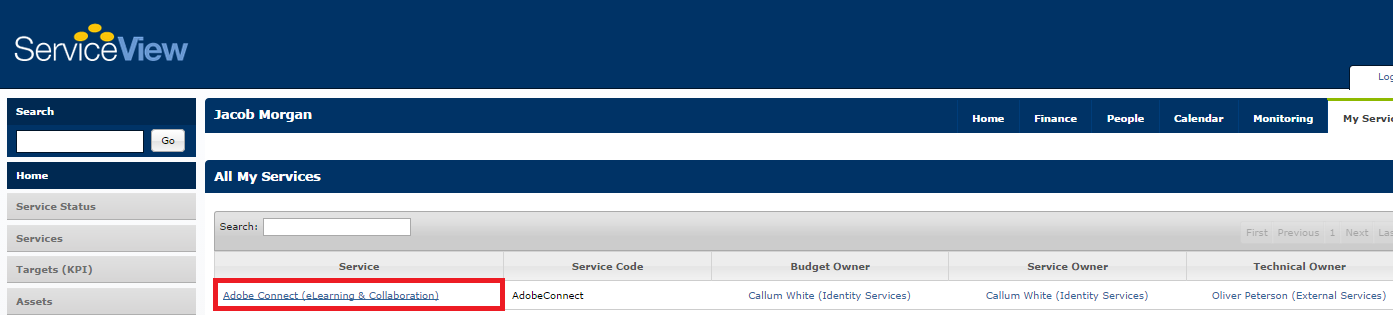
Once the Service has been selected, you will need to click on the Edit Service button.
Select the Owners tab and complete the empty fields.
Select Save once done.